

AD0-E906
Exam Name: Adobe Workfront for Experience Manager
Enhanced Connector Expert
Full version: 55 Q&As
Full version of AD0-E906 Dumps
Share some AD0-E906 exam dumps below.
1. A request form has a calculated field Allowable Days that calculates the number of days
between the request Entry Date and the custom field Required Delivery Date.
What must be set up on the corresponding Prefect custom form so the Required Delivery Dale
and the original number of Allowable Days display on the project?
1 / 9

A. Add both the Allowable Days and the Required Delivery Date fields as new text fields.
B. Add both Allowable Days and Required Denver Dale as calculated fields referencing the
request object.
C. Add Allowable Days as a calculated field and add Required Delivery Dale as a text field.
Answer: C
Explanation:
In this scenario, the calculated field Allowable Days and the Required Delivery Date need to
display on the project.
To achieve this:
Allowable Days: This is a calculated field, so it should be set up as a calculated field in the
project custom form, which references the difference between the Request Entry Date and the
Required Delivery Date.
Required Delivery Date: This is a static field and should be displayed as a text field to ensure
that the original requested delivery date is retained.
Option B is incorrect because both fields do not need to be calculated. The Required Delivery
Date is already a static value and doesn’t require calculation.
For more information, refer to the Workfront documentation on setting up calculated fields and
text fields in custom forms.
2. An internal marketing department is building a new workflow where they need to have the
task assignee upload a document. That document then needs to be reviewed and potentially
marked up with annotations as part of the review process. Then the document needs to be
approved by the director of creative marketing and the customer.
Which document management process meets this requirement?
A. Upload the document using Approvals under document details
B. Upload the document with a proofing approval workflow attached
C. Upload the document to subtask assigned to approvers
Answer: B
Explanation:
For a workflow where a task assignee must upload a document, have it reviewed and marked
up with annotations, and then have it approved by the director and customer, the best option is
to upload the document with a proofing approval workflow attached. Proofing workflows allow
for: Annotations: Reviewers can mark up the document with comments and annotations.
Approvals: Once the document is reviewed, it can go through the necessary approval stages,
including the director and customer.
Option A (using approvals under document details) does not allow for the same level of markup
2 / 9

and annotation as a proofing workflow.
Option C (uploading to a subtask) is not an ideal way to manage the review and approval
process with annotations.
Refer to Workfront’s proofing documentation for more information on setting up proofing
workflows with annotations and approvals.
3. For a customer, the local deployment process needs to differ from Cloud Manager. A
developer
wants to execute maven profile for the Cloud Manager deployment pipeline only.
Which configuration should the developer use?
A)
B)
C)
A. Option A
B. Option B
C. Option C
Answer: C
Explanation:
In the given scenario, the developer needs to execute a Maven profile specifically for the Cloud
3 / 9
Manager deployment pipeline. This requires the use of a property that is exclusive to Cloud
Manager, allowing the profile to activate only when the build is being executed in the Cloud
Manager environment.
Option C uses the correct activation property:
<name>env.cloudmanager</name>
This property is specific to Adobe's Cloud Manager environment, ensuring that this Maven
profile will only be activated during Cloud Manager deployments. This allows the local
deployment process to remain unaffected while the correct profile is triggered in Cloud
Manager.
Options A and B use other properties (env.CM_BUILD or CM_BUILD) that are not standard or
specific to the Cloud Manager environment, making them incorrect choices.
For more details, you can refer to Adobe’s Cloud Manager Maven Configuration
documentation, which outlines how to configure Maven profiles specifically for Cloud Manager's
deployment pipelines.
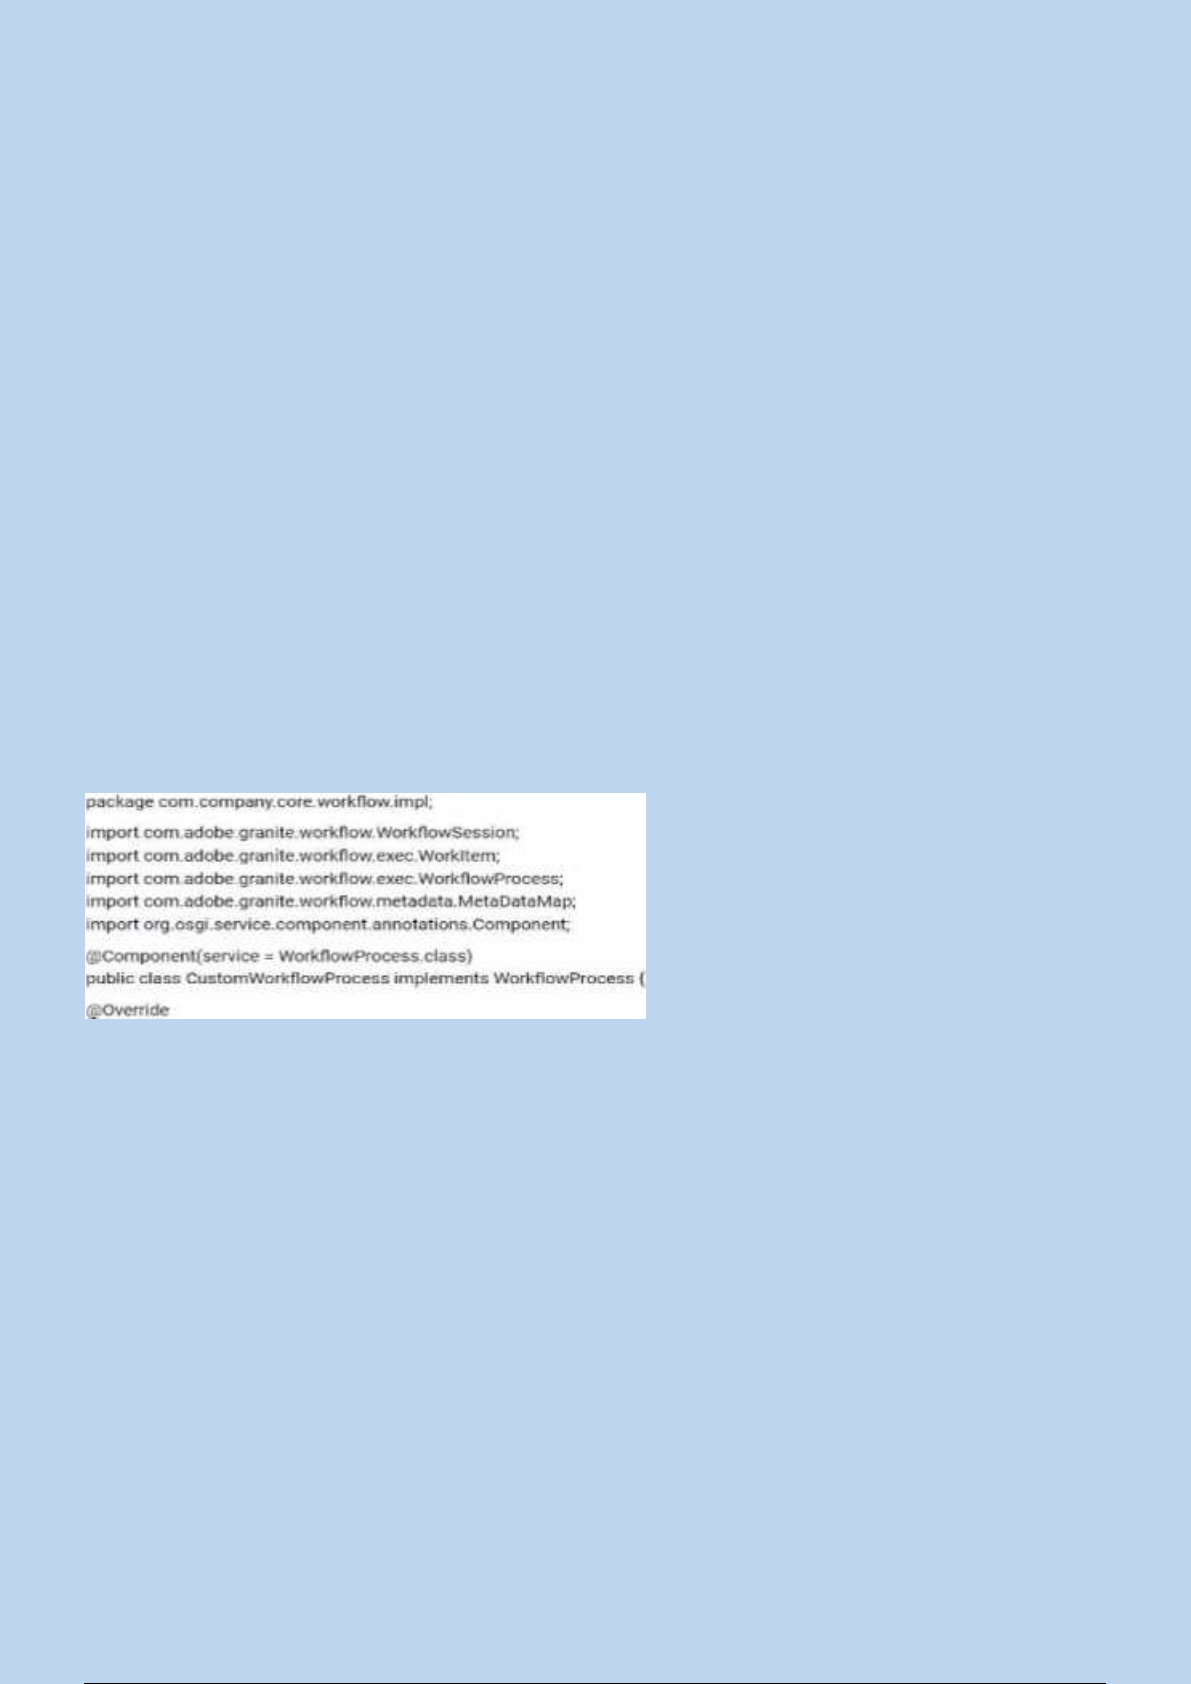
4. A developer implements a custom workflow process using the following code:
The code bundle has been deployed to AEM and displays as active in the Web Console. The
developer has created a new workflow model, added a process step, and wants to configure
that step to use the custom workflow process. However, the custom workflow process does not
appear in the dropdown menu.
What should be done to resolve this issue?
A. Add the process. label property to the @Component annotation in the
CustomizationflowProcess class
B. Add the process. title property to the @Component annotation in the
CustomizationflowProcess class
C. Add the process. name property to the @Component annotation in the
CustomizationflowProcess class
Answer: C
4 / 9

Explanation:
In AEM, for a custom workflow process to be available for selection in the dropdown menu of a
process step, the process.name property must be set in the @Component annotation. This
property defines the unique name under which the custom workflow process will be registered
and visible in the workflow model editor.
Here is an example of how this should be added to the existing code:
@Component(service = WorkflowProcess.class,
property = {"process.label=Custom Workflow Process",
"process.name=customWorkflowProcess"})
process.label: This is the label that appears in the workflow model editor dropdown.
process.name: This is the internal identifier used by AEM to register the workflow process.
Options A and B would define other properties but will not resolve the issue of the custom
workflow not appearing in the dropdown. The key property needed here is process.name.
For more details, refer to the AEM documentation on creating custom workflows and annotating
components.
5. An implementation consultant wants to configure the enhanced connector inside a customer's
Adobe Experience Manager environment. The customer needs the following functionality,
automatic creation of project linked folders, comments syncing, and the automatic publishing of
assets.
How should the consultant navigate to the enhanced connector configuration screens?
A. Tools > Workfront Tools> Workfront Tools Configuration, select the configuration, and select
Properties in the action bar
B. Tools > Cloud Services > Workfront Toots Configuration, select the configuration, and select
Properties in the action bar.
C. Tools > Asset> Workfront Tools Configuration, select the configuration, and select Properties
in the action bar.
Answer: A
Explanation:
To configure the Enhanced Connector in AEM, including features like automatic project-linked
folder creation, comment syncing, and automatic publishing of assets, you should navigate to:
Tools > Workfront Tools > Workfront Tools Configuration: This is where you can access and
configure the connector settings within AEM. From there, selecting the configuration and
choosing Properties in the action bar allows you to adjust the required settings.
Options B and C reference incorrect paths (Cloud Services and Assets), which are not used for
the Enhanced Connector configuration.
5 / 9
Refer to AEM’s Enhanced Connector documentation for step-by-step instructions on accessing
and configuring the connector.
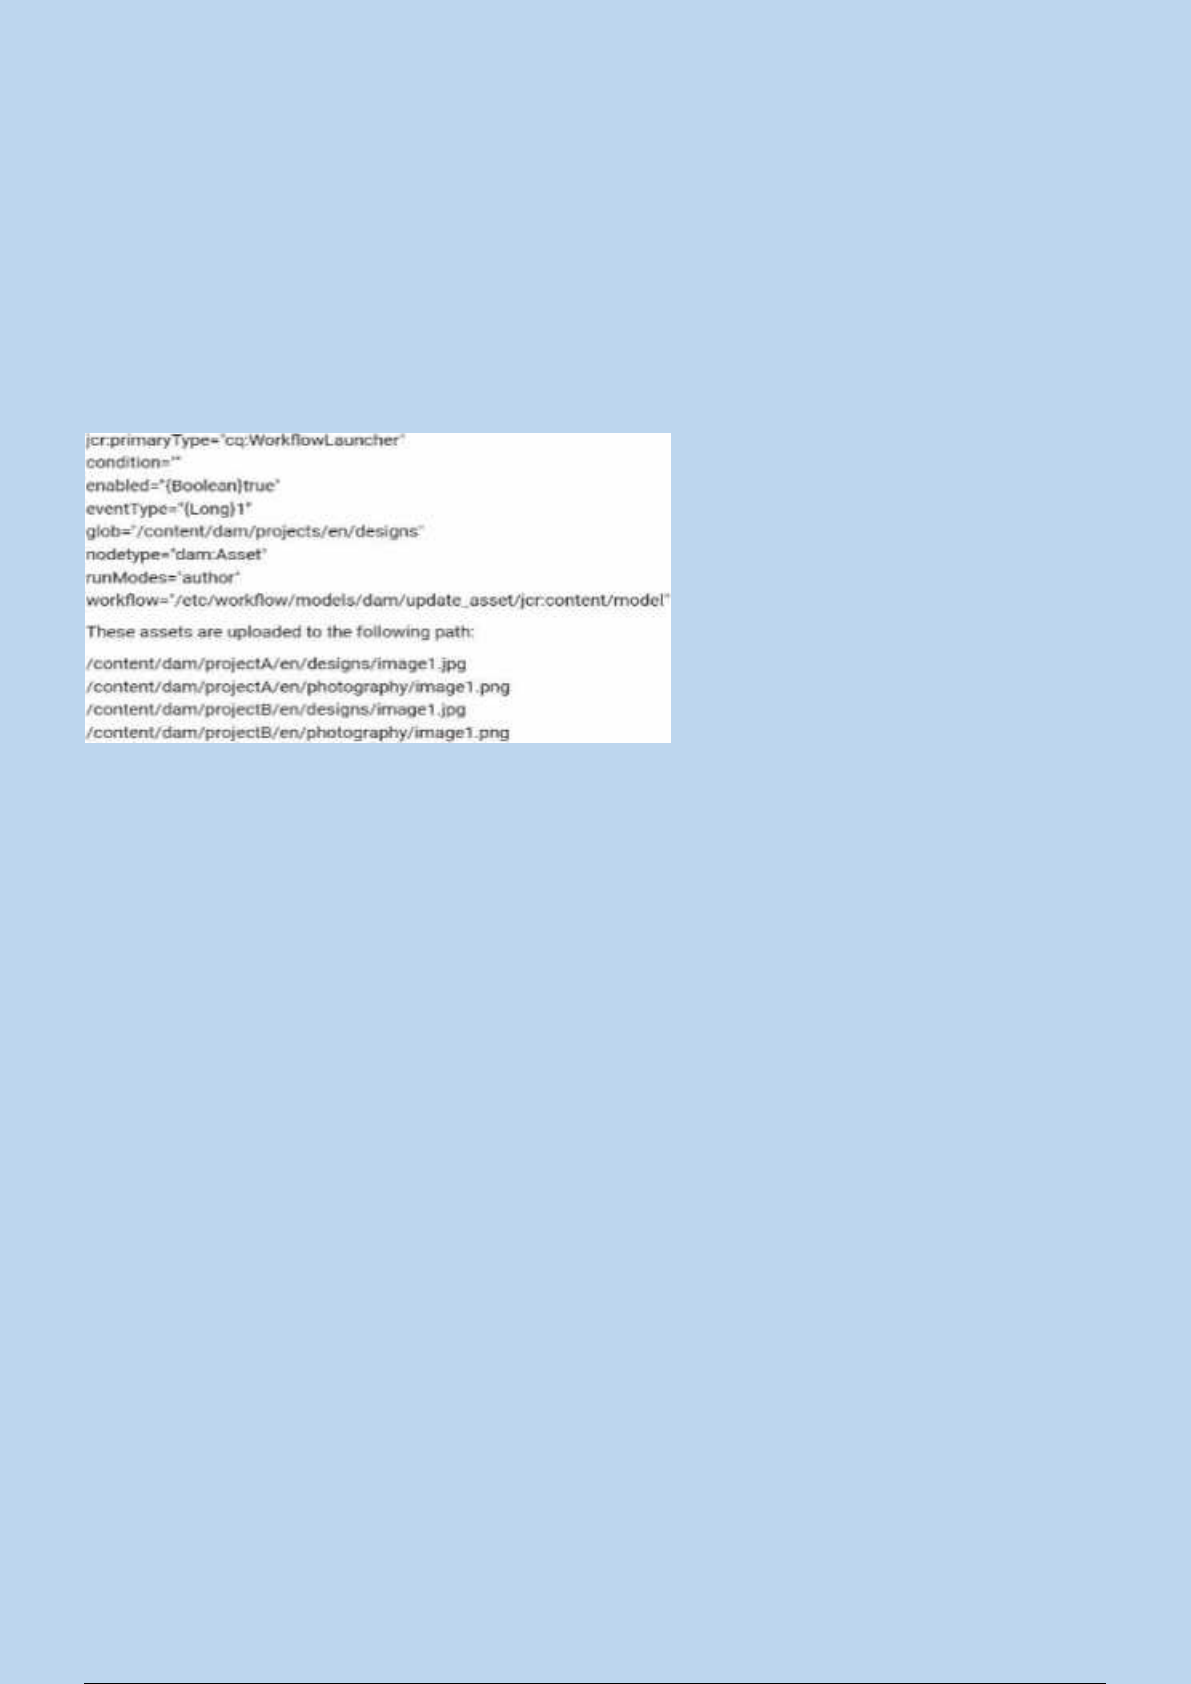
6. Given the following workflow launcher configuration:
What change should be made to the configuration to trigger the workflow?
A. Modify the condition to dc ==image/
B. Modify the path to /content/dam/.<em>/)en(/.<em>/)
C. Modify the node type to nt:file
Answer: A
Explanation:
In this scenario, the workflow launcher is configured to trigger a workflow for assets in the path
/content/dam/projects/en/designs. However, to ensure that the workflow only triggers for image
assets, the condition must be updated to filter the relevant asset types. The condition should be
modified to dc:format==image/*, which ensures that only assets with an image format trigger the
workflow.
Condition "dc
==image/*": This filters assets based on their format (MIME type), ensuring that the workflow is
only triggered for images, which matches the use case of working with assets such as JPGs or
PNGs. Option B suggests modifying the path, but the existing path
(/content/dam/projects/en/designs) is correct for the project structure. Option C suggests
changing the node type to nt:file, which is incorrect since the node type for assets in AEM is
typically dam:Asset.
For more information, refer to AEM documentation on workflow launchers and DAM metadata
6 / 9

properties.
7. A company purchases Adobe Workfront with a team plan and no Third-party products. They
occasionally need to upload a document related to a task for approval. Users do not need to
mark up
and comment on the uploaded documents, in addition, electronic validation is not currently a
requirement.
Which tool should be used to meet this need?
A. Workfront Proof
B. AdobeSign
C. Document approvals
Answer: C
Explanation:
Given that the company only occasionally needs to upload documents for approval and does
not require advanced features like markup or electronic validation, the Document approvals
feature in Workfront is the best choice.
Document approvals allow users to upload documents, assign approvers, and receive
approval/rejection responses without the need for advanced proofing or signing functionality.
Options A (Workfront Proof) and B (AdobeSign) provide more advanced capabilities like
markup, commenting, and e-signatures, which are unnecessary for this use case.
Refer to Workfront’s document management features for more information on basic approval
workflows.
8. A project manager wants to ensure that all documents within a certain project are shared with
a designated team in Workfront.
What is the correct option for carrying out this action?
A. Link all the necessary document from Experience Manager to the designated project
B. Find the project where these document all reside and share it with the entire team
C. Share one of the documents the others will inherit the same access levels
Answer: B
Explanation:
In Workfront, the best way to ensure that all documents within a project are shared with a
designated team is to share the entire project. By sharing the project, all documents and related
assets within that project are automatically made available to the designated team members
according to the project's access permissions.
Option C is incorrect because sharing one document does not automatically inherit the same
7 / 9

access levels for the other documents. Option A suggests linking documents from AEM, but the
question pertains to sharing documents within Workfront itself.
Refer to Workfront’s documentation on document sharing for detailed instructions on how to
share all project-related assets with teams.
9. Metadata mappings between Adobe Workfront and the AEM have been configured A user
wants to send a document and its metadata from Adobe Workfront to Adobe Experience
Manager Assets.
How should the user accomplish this?
A. Select the document in Workfront click Send to. choose the experience Manager integration,
choose the metadata to synch
B. Select the document in Workfront. click Send to, choose the Experience Manager integration,
and metadata will synch automatically
C. Select the document in workfront. choose New Version, choose the experience Manager
integration, choose the metadata to synch
Answer: B
Explanation:
When metadata mappings between Adobe Workfront and AEM are configured, the process of
sending a document along with its metadata from Workfront to Adobe Experience Manager
(AEM) Assets is streamlined. The user selects the document in Workfront, clicks "Send to," and
chooses the Experience Manager integration.
The metadata fields that have been mapped are automatically synchronized along with the
document. There is no need for manual selection of metadata at this stage, as the integration
ensures that all configured mappings are applied.
This functionality is part of the enhanced connector, which simplifies the workflow between
Workfront and AEM Assets by automating the synchronization of mapped metadata fields
during the document transfer.
For more details, refer to Adobe's documentation on Workfront for Experience Manager
Enhanced Connector, which outlines how automatic metadata synchronization works during
document transfers.
8 / 9

Text Material Preview
<p>AD0-E906</p><p>Exam Name: Adobe Workfront for Experience Manager</p><p>Enhanced Connector Expert</p><p>Full version: 55 Q&As</p><p>Full version of AD0-E906 Dumps</p><p>Share some AD0-E906 exam dumps below.</p><p>1. A request form has a calculated field Allowable Days that calculates the number of days</p><p>between the request Entry Date and the custom field Required Delivery Date.</p><p>What must be set up on the corresponding Prefect custom form so the Required Delivery Dale</p><p>and the original number of Allowable Days display on the project?</p><p>1 / 9</p><p>https://www.certqueen.com/AD0-E906.html</p><p>A. Add both the Allowable Days and the Required Delivery Date fields as new text fields.</p><p>B. Add both Allowable Days and Required Denver Dale as calculated fields referencing the</p><p>request object.</p><p>C. Add Allowable Days as a calculated field and add Required Delivery Dale as a text field.</p><p>Answer: C</p><p>Explanation:</p><p>In this scenario, the calculated field Allowable Days and the Required Delivery Date need to</p><p>display on the project.</p><p>To achieve this:</p><p>Allowable Days: This is a calculated field, so it should be set up as a calculated field in the</p><p>project custom form, which references the difference between the Request Entry Date and the</p><p>Required Delivery Date.</p><p>Required Delivery Date: This is a static field and should be displayed as a text field to ensure</p><p>that the original requested delivery date is retained.</p><p>Option B is incorrect because both fields do not need to be calculated. The Required Delivery</p><p>Date is already a static value and doesn’t require calculation.</p><p>For more information, refer to the Workfront documentation on setting up calculated fields and</p><p>text fields in custom forms.</p><p>2. An internal marketing department is building a new workflow where they need to have the</p><p>task assignee upload a document. That document then needs to be reviewed and potentially</p><p>marked up with annotations as part of the review process. Then the document needs to be</p><p>approved by the director of creative marketing and the customer.</p><p>Which document management process meets this requirement?</p><p>A. Upload the document using Approvals under document details</p><p>B. Upload the document with a proofing approval workflow attached</p><p>C. Upload the document to subtask assigned to approvers</p><p>Answer: B</p><p>Explanation:</p><p>For a workflow where a task assignee must upload a document, have it reviewed and marked</p><p>up with annotations, and then have it approved by the director and customer, the best option is</p><p>to upload the document with a proofing approval workflow attached. Proofing workflows allow</p><p>for: Annotations: Reviewers can mark up the document with comments and annotations.</p><p>Approvals: Once the document is reviewed, it can go through the necessary approval stages,</p><p>including the director and customer.</p><p>Option A (using approvals under document details) does not allow for the same level of markup</p><p>2 / 9</p><p>and annotation as a proofing workflow.</p><p>Option C (uploading to a subtask) is not an ideal way to manage the review and approval</p><p>process with annotations.</p><p>Refer to Workfront’s proofing documentation for more information on setting up proofing</p><p>workflows with annotations and approvals.</p><p>3. For a customer, the local deployment process needs to differ from Cloud Manager. A</p><p>developer</p><p>wants to execute maven profile for the Cloud Manager deployment pipeline only.</p><p>Which configuration should the developer use?</p><p>A)</p><p>B)</p><p>C)</p><p>A. Option A</p><p>B. Option B</p><p>C. Option C</p><p>Answer: C</p><p>Explanation:</p><p>In the given scenario, the developer needs to execute a Maven profile specifically for the Cloud</p><p>3 / 9</p><p>Manager deployment pipeline. This requires the use of a property that is exclusive to Cloud</p><p>Manager, allowing the profile to activate only when the build is being executed in the Cloud</p><p>Manager environment.</p><p>Option C uses the correct activation property:</p><p><name>env.cloudmanager</name></p><p>This property is specific to Adobe's Cloud Manager environment, ensuring that this Maven</p><p>profile will only be activated during Cloud Manager deployments. This allows the local</p><p>deployment process to remain unaffected while the correct profile is triggered in Cloud</p><p>Manager.</p><p>Options A and B use other properties (env.CM_BUILD or CM_BUILD) that are not standard or</p><p>specific to the Cloud Manager environment, making them incorrect choices.</p><p>For more details, you can refer to Adobe’s Cloud Manager Maven Configuration</p><p>documentation, which outlines how to configure Maven profiles specifically for Cloud Manager's</p><p>deployment pipelines.</p><p>4. A developer implements a custom workflow process using the following code:</p><p>The code bundle has been deployed to AEM and displays as active in the Web Console. The</p><p>developer has created a new workflow model, added a process step, and wants to configure</p><p>that step to use the custom workflow process. However, the custom workflow process does not</p><p>appear in the dropdown menu.</p><p>What should be done to resolve this issue?</p><p>A. Add the process. label property to the @Component annotation in the</p><p>CustomizationflowProcess class</p><p>B. Add the process. title property to the @Component annotation in the</p><p>CustomizationflowProcess class</p><p>C. Add the process. name property to the @Component annotation in the</p><p>CustomizationflowProcess class</p><p>Answer: C</p><p>4 / 9</p><p>Explanation:</p><p>In AEM, for a custom workflow process to be available for selection in the dropdown menu of a</p><p>process step, the process.name property must be set in the @Component annotation. This</p><p>property defines the unique name under which the custom workflow process will be registered</p><p>and visible in the workflow model editor.</p><p>Here is an example of how this should be added to the existing code:</p><p>@Component(service = WorkflowProcess.class,</p><p>property = {"process.label=Custom Workflow Process",</p><p>"process.name=customWorkflowProcess"})</p><p>process.label: This is the label that appears in the workflow model editor dropdown.</p><p>process.name: This is the internal identifier used by AEM to register the workflow process.</p><p>Options A and B would define other properties but will not resolve the issue of the custom</p><p>workflow not appearing in the dropdown. The key property needed here is process.name.</p><p>For more details, refer to the AEM documentation on creating custom workflows and annotating</p><p>components.</p><p>5. An implementation consultant wants to configure the enhanced connector inside a customer's</p><p>Adobe Experience Manager environment. The customer needs the following functionality,</p><p>automatic creation of project linked folders, comments syncing, and the automatic publishing of</p><p>assets.</p><p>How should the consultant navigate to the enhanced connector configuration screens?</p><p>A. Tools > Workfront Tools> Workfront Tools Configuration, select the configuration, and select</p><p>Properties in the action bar</p><p>B. Tools > Cloud Services > Workfront Toots Configuration, select the configuration, and select</p><p>Properties in the action bar.</p><p>C. Tools > Asset> Workfront Tools Configuration, select the configuration, and select Properties</p><p>in the action bar.</p><p>Answer: A</p><p>Explanation:</p><p>To configure the Enhanced Connector in AEM, including features like automatic project-linked</p><p>folder creation, comment syncing, and automatic publishing of assets, you should navigate to:</p><p>Tools > Workfront Tools > Workfront Tools Configuration: This is where you can access and</p><p>configure the connector settings within AEM. From there, selecting the configuration and</p><p>choosing Properties in the action bar allows you to adjust the required settings.</p><p>Options B and C reference incorrect paths (Cloud Services and Assets), which are not used for</p><p>the Enhanced Connector configuration.</p><p>5 / 9</p><p>Refer to AEM’s Enhanced Connector documentation for step-by-step instructions on accessing</p><p>and configuring the connector.</p><p>6. Given the following workflow launcher configuration:</p><p>What change should be made to the configuration to trigger the workflow?</p><p>A. Modify the</p><p>condition to dc ==image/</p><p>B. Modify the path to /content/dam/.<em>/)en(/.<em>/)</p><p>C. Modify the node type to nt:file</p><p>Answer: A</p><p>Explanation:</p><p>In this scenario, the workflow launcher is configured to trigger a workflow for assets in the path</p><p>/content/dam/projects/en/designs. However, to ensure that the workflow only triggers for image</p><p>assets, the condition must be updated to filter the relevant asset types. The condition should be</p><p>modified to dc:format==image/*, which ensures that only assets with an image format trigger the</p><p>workflow.</p><p>Condition "dc</p><p>==image/*": This filters assets based on their format (MIME type), ensuring that the workflow is</p><p>only triggered for images, which matches the use case of working with assets such as JPGs or</p><p>PNGs. Option B suggests modifying the path, but the existing path</p><p>(/content/dam/projects/en/designs) is correct for the project structure. Option C suggests</p><p>changing the node type to nt:file, which is incorrect since the node type for assets in AEM is</p><p>typically dam:Asset.</p><p>For more information, refer to AEM documentation on workflow launchers and DAM metadata</p><p>6 / 9</p><p>properties.</p><p>7. A company purchases Adobe Workfront with a team plan and no Third-party products. They</p><p>occasionally need to upload a document related to a task for approval. Users do not need to</p><p>mark up</p><p>and comment on the uploaded documents, in addition, electronic validation is not currently a</p><p>requirement.</p><p>Which tool should be used to meet this need?</p><p>A. Workfront Proof</p><p>B. AdobeSign</p><p>C. Document approvals</p><p>Answer: C</p><p>Explanation:</p><p>Given that the company only occasionally needs to upload documents for approval and does</p><p>not require advanced features like markup or electronic validation, the Document approvals</p><p>feature in Workfront is the best choice.</p><p>Document approvals allow users to upload documents, assign approvers, and receive</p><p>approval/rejection responses without the need for advanced proofing or signing functionality.</p><p>Options A (Workfront Proof) and B (AdobeSign) provide more advanced capabilities like</p><p>markup, commenting, and e-signatures, which are unnecessary for this use case.</p><p>Refer to Workfront’s document management features for more information on basic approval</p><p>workflows.</p><p>8. A project manager wants to ensure that all documents within a certain project are shared with</p><p>a designated team in Workfront.</p><p>What is the correct option for carrying out this action?</p><p>A. Link all the necessary document from Experience Manager to the designated project</p><p>B. Find the project where these document all reside and share it with the entire team</p><p>C. Share one of the documents the others will inherit the same access levels</p><p>Answer: B</p><p>Explanation:</p><p>In Workfront, the best way to ensure that all documents within a project are shared with a</p><p>designated team is to share the entire project. By sharing the project, all documents and related</p><p>assets within that project are automatically made available to the designated team members</p><p>according to the project's access permissions.</p><p>Option C is incorrect because sharing one document does not automatically inherit the same</p><p>7 / 9</p><p>access levels for the other documents. Option A suggests linking documents from AEM, but the</p><p>question pertains to sharing documents within Workfront itself.</p><p>Refer to Workfront’s documentation on document sharing for detailed instructions on how to</p><p>share all project-related assets with teams.</p><p>9. Metadata mappings between Adobe Workfront and the AEM have been configured A user</p><p>wants to send a document and its metadata from Adobe Workfront to Adobe Experience</p><p>Manager Assets.</p><p>How should the user accomplish this?</p><p>A. Select the document in Workfront click Send to. choose the experience Manager integration,</p><p>choose the metadata to synch</p><p>B. Select the document in Workfront. click Send to, choose the Experience Manager integration,</p><p>and metadata will synch automatically</p><p>C. Select the document in workfront. choose New Version, choose the experience Manager</p><p>integration, choose the metadata to synch</p><p>Answer: B</p><p>Explanation:</p><p>When metadata mappings between Adobe Workfront and AEM are configured, the process of</p><p>sending a document along with its metadata from Workfront to Adobe Experience Manager</p><p>(AEM) Assets is streamlined. The user selects the document in Workfront, clicks "Send to," and</p><p>chooses the Experience Manager integration.</p><p>The metadata fields that have been mapped are automatically synchronized along with the</p><p>document. There is no need for manual selection of metadata at this stage, as the integration</p><p>ensures that all configured mappings are applied.</p><p>This functionality is part of the enhanced connector, which simplifies the workflow between</p><p>Workfront and AEM Assets by automating the synchronization of mapped metadata fields</p><p>during the document transfer.</p><p>For more details, refer to Adobe's documentation on Workfront for Experience Manager</p><p>Enhanced Connector, which outlines how automatic metadata synchronization works during</p><p>document transfers.</p><p>8 / 9</p><p>More Hot Exams are available.</p><p>350-401 ENCOR Exam Dumps</p><p>350-801 CLCOR Exam Dumps</p><p>200-301 CCNA Exam Dumps</p><p>Powered by TCPDF (www.tcpdf.org)</p><p>9 / 9</p><p>https://www.certqueen.com/promotion.asp</p><p>https://www.certqueen.com/350-401.html</p><p>https://www.certqueen.com/350-801.html</p><p>https://www.certqueen.com/200-301.html</p><p>http://www.tcpdf.org</p>More content from this subject
 Novas tecnologias na limpeza e desinfecção do ambiente hospitalarvantagens, desvantagens e critérios para seleção
- Sistema Nervoso Autônomo
- Inflamação
- What-are-Cytochrome-P450-Enzymes
- S14 - Metabolismo do Álcool
- metabolismo_do_etanol_1
- Apresentação_ ESG
- Estática nas estruturas
- Estática nas estruturas
- Estática nas estruturas
- Estática nas estruturas
- Estática nas estruturas
- As criptomoedas são uma forma de moeda ________ descentralizada baseada em tecnologia de blockchain. Essas moedas oferecem transações ________ e tr...
- Área do(a) aluno(a) - Universida x THe Fazer teste: ATIVIDADE TELEAUL x + /assessment/take/launch.jsp?course_assessment_id=_1744664_18course_id= as...
- Envelhecer O que significa envelhecer? Ficar enrugado, debilitado, necessitado, fragilizado? Como podemos dizer que envelhecer é uma benção? Existe...
- Juniper Certification JN0-280 Dumps Questions
- OGEA-102 TOGAF Enterprise Architecture Part 2 Exam Dumps
Content selected for you


Questions from this subject
More content from this subject
- Novas tecnologias na limpeza e desinfecção do ambiente hospitalarvantagens, desvantagens e critérios para seleção
- Sistema Nervoso Autônomo
- Inflamação
- What-are-Cytochrome-P450-Enzymes
- S14 - Metabolismo do Álcool
- metabolismo_do_etanol_1
- Apresentação_ ESG
- Estática nas estruturas
- Estática nas estruturas
- Estática nas estruturas
- Estática nas estruturas
- Estática nas estruturas
- As criptomoedas são uma forma de moeda ________ descentralizada baseada em tecnologia de blockchain. Essas moedas oferecem transações ________ e tr...
- Área do(a) aluno(a) - Universida x THe Fazer teste: ATIVIDADE TELEAUL x + /assessment/take/launch.jsp?course_assessment_id=_1744664_18course_id= as...
- Envelhecer O que significa envelhecer? Ficar enrugado, debilitado, necessitado, fragilizado? Como podemos dizer que envelhecer é uma benção? Existe...
- Juniper Certification JN0-280 Dumps Questions
- OGEA-102 TOGAF Enterprise Architecture Part 2 Exam Dumps